The "Free" Car
By Mel Agne
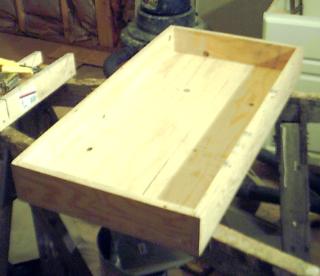
One day while at work, I happened upon a wooden box which was being scrapped. It immediately caught my eye because of its size, and the quality of the plywood that it was built with.
 Upon
measuring the box, it was found to be 17.5" X 33". This works
out to be a 1/8 scale body 22 feet long and 11.6 feet wide. Quite
appropriate, albeit a tad wide for the scale purist. However, a free high
quality wood box, is a free high quality wood box, and this one had tool car
written all over it. I decided since this would be my first car project,
and that the purpose of the car was somewhat utilitarian, that I would not be
too particular about the detail level. I just wanted to build a car that
looked like a car should. Since the box was free, I thought I would pursue
that theme and try to use materials that were on hand. I have seen other
car projects on the web that successfully looked good with sheet metal laminated
over wood, so I thought I would take this approach. It may not be a steel
car at heart, but that doesn't mean it can't look like one. I have some
household construction projects going on, and have a lot of leftover HVAC
materials, including some aluminum sheet for return duct work, and some aluminum
hangers and other miscellany, so I felt with a pair of tin snips, I would get
started.
Upon
measuring the box, it was found to be 17.5" X 33". This works
out to be a 1/8 scale body 22 feet long and 11.6 feet wide. Quite
appropriate, albeit a tad wide for the scale purist. However, a free high
quality wood box, is a free high quality wood box, and this one had tool car
written all over it. I decided since this would be my first car project,
and that the purpose of the car was somewhat utilitarian, that I would not be
too particular about the detail level. I just wanted to build a car that
looked like a car should. Since the box was free, I thought I would pursue
that theme and try to use materials that were on hand. I have seen other
car projects on the web that successfully looked good with sheet metal laminated
over wood, so I thought I would take this approach. It may not be a steel
car at heart, but that doesn't mean it can't look like one. I have some
household construction projects going on, and have a lot of leftover HVAC
materials, including some aluminum sheet for return duct work, and some aluminum
hangers and other miscellany, so I felt with a pair of tin snips, I would get
started.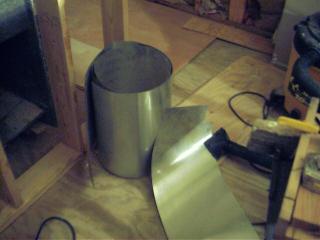
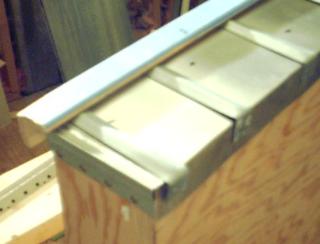
I began by cutting a length of aluminum sheet a few inches longer than the box. I then used a hand brake (A pliers like tool used to bend sheet metal in the ducting trade) to bend one edge of the sheet uniformly along its lenght at a 90 degree angle. I laid the box on its side, and placed the bent portion along the bottom edge, letting the balance of the material hang over what will be the top of the car. I then traced the profile of the side from the back with a Sharpie marker. Next, using the tin snips, I cut along the lines that the Sharpie made. I then used the hand brake to bend the other 3 edges to form a box around the sides.
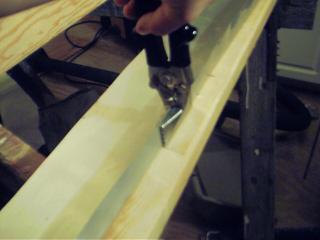 Next,
I examined an HO scale gondola to get an idea of how the ribs are laid out on
most steel sided cars. I found that they are placed a scale 3' apart, so I
divided up the length of the box and found that 8 ribs would do the job.
Following prototype practice, I measured from the ends to the center in 4"
intervals and marked the location of the ribs. To make the ribs, I
returned to my "free car" concept, and looked around for what might
make a good rib. I found the answer overhead. My rafters are X
braced with metal straps, which are about a half inch wide, and bent lengthwise
at about a 30 degree angle. I had a whole box of them left over, so with
some examination, I found they would work out perfectly. I began by using
the hand brake to flatten and bend over about 3/4 of an inch of the material to
a 90 degree angle. I then punched a 1/8 whole in the flat part. This
will be where the mounting screw holds the bottom of the rib to the bottom of
the car. I then cut the strap within 1/4 inch of the top of the car.
The top of the rib will be held in place by the top rail which goes on
last. I made and fastened the 8 ribs in place with 1/4 hex head sheet
metal screws. The next area of concern was the corners of the car. I
didn't have to look far to find the material for that either. Drywall is
protected on outside corners by a formed metal crown, which I had lots of
around. So, I cut a length of that to cover the corner. The drywall
crown has lots of holes in it to take screws and spackling, and I wanted
to cover these up. Solution - another rib. I fashioned two more ribs
to cover the edges of the drywall cap.
Next,
I examined an HO scale gondola to get an idea of how the ribs are laid out on
most steel sided cars. I found that they are placed a scale 3' apart, so I
divided up the length of the box and found that 8 ribs would do the job.
Following prototype practice, I measured from the ends to the center in 4"
intervals and marked the location of the ribs. To make the ribs, I
returned to my "free car" concept, and looked around for what might
make a good rib. I found the answer overhead. My rafters are X
braced with metal straps, which are about a half inch wide, and bent lengthwise
at about a 30 degree angle. I had a whole box of them left over, so with
some examination, I found they would work out perfectly. I began by using
the hand brake to flatten and bend over about 3/4 of an inch of the material to
a 90 degree angle. I then punched a 1/8 whole in the flat part. This
will be where the mounting screw holds the bottom of the rib to the bottom of
the car. I then cut the strap within 1/4 inch of the top of the car.
The top of the rib will be held in place by the top rail which goes on
last. I made and fastened the 8 ribs in place with 1/4 hex head sheet
metal screws. The next area of concern was the corners of the car. I
didn't have to look far to find the material for that either. Drywall is
protected on outside corners by a formed metal crown, which I had lots of
around. So, I cut a length of that to cover the corner. The drywall
crown has lots of holes in it to take screws and spackling, and I wanted
to cover these up. Solution - another rib. I fashioned two more ribs
to cover the edges of the drywall cap.
 Here
was the proof of concept picture then. But what to use for the top
rail? More "free" stuff. Ok, this stuff wasn't free, but I
had extra, so you know what I mean. Ducting is held up with aluminum strap
that is flat and bends easy. It is essentially a flat strap that has had
its edges folded over to the center. I found that the claw of a hammer
would do a good job of working one of the folded sides out, so I used that to
work it to about a 24 degree angle, after which the hand brake took over, and
worked the metal out to a 90 degree angle. Once accomplished, the strap
had a slight bow to it that was in favor of putting the ribs under some spring
tension, which would work out great. I put the strap in place, and cut the
excess off. I then formed the ends to fold down over the ends of the box,
and fastened those with a sheet metal screw.
Here
was the proof of concept picture then. But what to use for the top
rail? More "free" stuff. Ok, this stuff wasn't free, but I
had extra, so you know what I mean. Ducting is held up with aluminum strap
that is flat and bends easy. It is essentially a flat strap that has had
its edges folded over to the center. I found that the claw of a hammer
would do a good job of working one of the folded sides out, so I used that to
work it to about a 24 degree angle, after which the hand brake took over, and
worked the metal out to a 90 degree angle. Once accomplished, the strap
had a slight bow to it that was in favor of putting the ribs under some spring
tension, which would work out great. I put the strap in place, and cut the
excess off. I then formed the ends to fold down over the ends of the box,
and fastened those with a sheet metal screw.
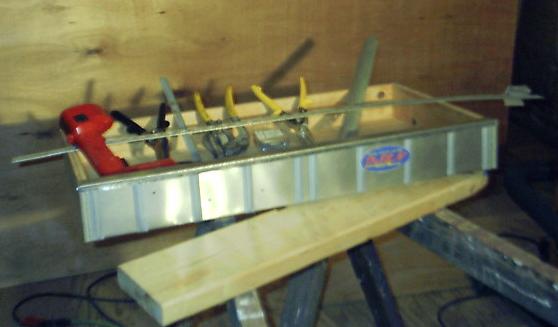
This then is the finished side. A temporary DS&N "decal" is taped to the car to finish the illusion. I think I will go back now and paint the entire car to seal the wood, and then re-apply the parts using construction adhesive to fasten the sheet aluminum to the wood, and I will also run a bead of it under the top rail to hold everything in place. It took only 1 hour, using only the tools and materials shown here to do one side.
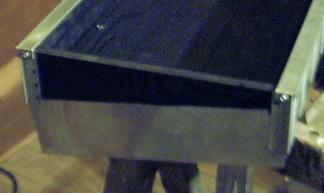
 Things
are moving along nicely now. The last end is being put on, and this shows
how the sheet was notched out and put into place.
Things
are moving along nicely now. The last end is being put on, and this shows
how the sheet was notched out and put into place.
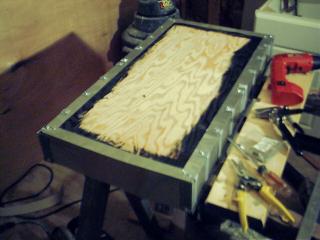
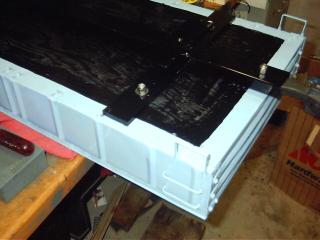
Here is a bottom view of the completed body.
Next, the frame was welded up, and painted, and the couplers (from Mountain Car) were installed. The frame was built using these plans from the Illinois Live Steamers site as a guide.

The body was detailed using steps and grabs from Precision Steel Car company, and a brake wheel and housing from Mountain Car. Next it was spray painted with regular run of the mill hardware store quick dry enamel.

Note that the end ribs had to be flattened where the brake wheel housing was mounted. Next the body was mated to the frame. There were some clearance issues due to my lack of planning between the upper body support, and the screws used to fasten the side ribs. I was able to overcome this by just removing the screws, as the frame would hold the strap in place instead.
Next the car was stenciled and lettered, using home made stencils cut out of paper, and the reporting marks were done with laminating plastic and a laser printer, making a stick on label.
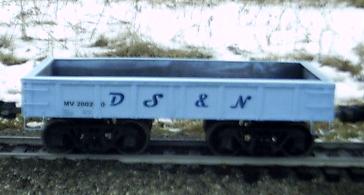
I was quite pleased with the way it turned out.